Aug
14
2011
My first impressions and overview of Final Cut Pro X – Apple’s bold re-design of the venerable Final Cut Pro non-linear video editing application. Learn what’s new and different and whether it’s right for you.
 Apple released Final Cut Pro X a little over a month ago and I finally had a chance to get my hands on it for my first test drive with the actual application. I had previously read the various bits of information Apple and others have posted about this new update to the Final Cut professional video editing app, but nothing can compare with actually using it yourself. Here are some of my initial impressions and thoughts from my test drive with this new non-linear editing app.
One of the very first things you notice when you fire up this app is that the video and audio tracks where you used to drop and arrange all your content are gone. Instead you get a trackless space to work in where you assemble your clips. There is sort of a main “track” that Apple calls the primary storyline which is where the first clip you add goes and where you will most likely place all the clips that will follow chronologically. You can still stack up clips to create various overlay effects or to have cut-away shots, but instead of thinking about these as going on separate tracks as in older versions of Final Cut, these become secondary storylines that attach to an anchor point on the primary storyline.
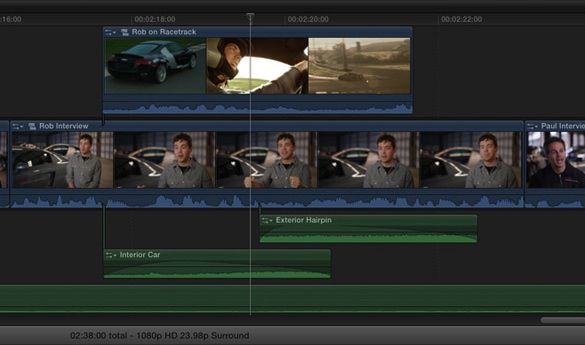
This is a pretty big change from how things used to work and I think it’s a huge step forward in both functionality and UI design. The main reason is that this is closer to how think about things when I’m planning out the video in my head before I edit it. The tracks feature that existing in Final Cut Pro 7 and before was an artifact of what was easy for the programmers to implement, not something that was tuned to how editing naturally flows. The big advantage with a trackless timeline and the ability to anchor clips to points in the main storyline is that it greatly simplifies the process of inserting new clips and re-arranging things as you go along. In previous versions, you had to be really careful when you inserted a new clip into the middle of a multi-track sequence since if the ripple edit from the insert didn’t target the right tracks then those tracks might end up out of sync. The really bad thing about this that bit me several times was that the part of the sequence with the layered tracks might be scrolled off the side of the screen out of sight, creating a good chance that I wouldn’t notice the disruptive ripple occurring. Things would go out of sync and I wouldn’t notice for some time, making the repair all that much more difficult. With the trackless timeline in Final Cut Pro X, this problem won’t happen anymore. For me, this feature is a real breath of fresh air.
A second readily visible departure from the previous version of Final Cut is that there are no more project bins. The window where you used to see all the media that had been imported to your project is now replaced with the Event Browser. This change clearly borrows from the recent versions of iMovie. When you import media into Final Cut Pro X, you bring it into an Event, not into the Project (though there is an option to consolidate your media into the Project folder). With your media sorted into Events, you can use the footage in multiple Projects. This makes the Events into a media library for the app which is an idea I really like. Unless you used Final Cut Server (which appears to be discontinued at this point), there was nothing like this in the previous version of Final Cut.
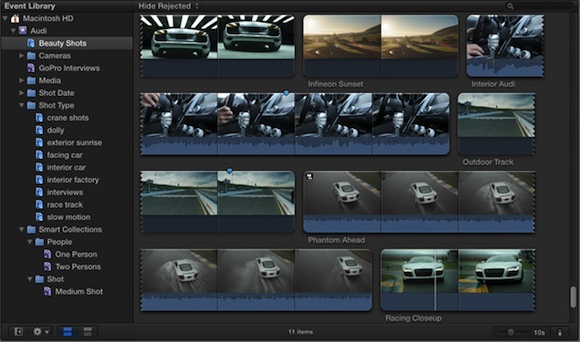
Another great thing about the Events Browsers is the filmstrip style view of your footage and the ability to skim across the filmstrip to quickly skim through your footage and find just what you want. This comes straight out of iMovie and I love it. In particular, I don’t have to spend so much time naming my clips so I can find the one I want when editing or trying to remember which one had the footage I need at a particular moment. The filmstrip view coupled with the skimming feature lets me very quickly locate the subclip I want.
In Final Cut Pro X, all video rendering happens automatically and transparently in the background. There’s an indicator that shows you it’s working on something in the background, but you no longer have to ask for rendering, and more importantly, you no longer have to sit and twiddle your thumbs while the rendering process is doing its thing. You can continue working and editing while the background rendering process takes advantage of spare cores on your machine that would otherwise be sitting idle. Background rendering is automatically suspended if you need the CPUs free for foreground activity like playback, and rendering automatically resumes once things go idle again. I find this a very welcome addition.
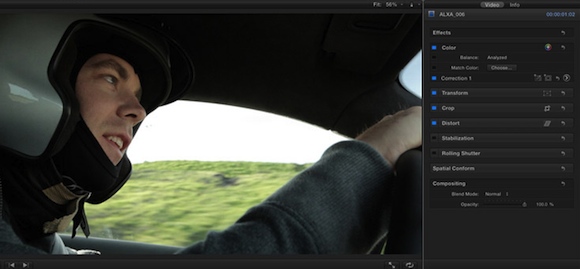
A third big change is that the separate Viewer and Canvas windows are now combined into one. There’s just one window that mostly acts as the Canvas did, but occasionally takes on tasks that the Viewer used to serve. This makes a lot of sense since being able to skim footage in the Events Browser pretty much removes the need for the Viewer window. A nice thing about this is that it gives you some space back on the screen allowing for a slightly larger Canvas window than I normally used to have. And when you need to adjust a clips parameters (like opacity, cropping and so forth), the Inspector window for these controls opens to the right of the Canvas. You used to adjust these parameters in the Viewer window but in a different tab from the video of the footage you were adjusting which always seemed odd to me. If you didn’t have the Canvas synced up with the clip you were adjusting in the Viewer, then you couldn’t see what you were doing. Now there’s never any doubt since you can see both the Canvas and the Inspector at the same time. I think this another big improvement in the overall UI design.
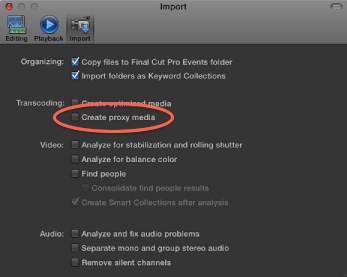
If you wanted to use proxy media in prior versions of Final Cut, you were expected to render the proxy media and connect it into your project on your own. This required you to know how to create the proxy files and to understand how media is connected together in Final Cut and how to use the Reconnect Media dialog. I don’t know about the rest of you, but it took me a while pouring over the manual to figure all this out and get it to work right. Thankfully, Final Cut Pro X now handles all this for you behind the scenes. All you have to do is to check the box on import that tells it to create proxy versions of you media and then check the box in your project preferences telling FCP to use proxy media if available. That’s it! Just two checkboxes and you’re using proxy media without having to reconnect media later before you do your final output. This is a really nice improvement and is the kind of busy work activity that apps should be doing for us. Having to render proxy media myself and know how to reconnect it to the project was a silly waste of my time that the app should just do for me behind the scenes. FCP X does this right.
When you create your first Final Cut Pro X project, you’ll notice pretty quickly that projects aren’t just single project files on your disk anymore. They’re now folders. One of the things in the project file is the traditional project file along with a bunch of other stuff. This collection of other stuff is there to make it easier to move projects between computers and keep everything together in a nice bundle. For example, one of the items in the project folder is another folder containing the Render files – all the stuff that FCP rendered for you. So when you drag and drop the project folder onto another computer, all the render media comes along for the ride which means you don’t have to waste time re-rendering everything on the new computer. Sure, it will take a little extra time to copy this across, but it’s much quicker than re-rendering the whole project.
You also have the option to consolidate all your media into the project folder. This includes any audio clips or still images you may have imported for use in the project. Again, keeping everything together makes it easier to move the project around and makes a great way to create a nice self-contained archive of all the pieces that went into a project.
Final Cut Pro X ships with numerous transitions and video effects, many more than in prior versions. The cool thing about these is that you can edit them. I’m not just talking about tweaking a few parameters. I mean being able to do major surgery on how a transition or effect works. The way this works is that transitions and effects in Final Cut are basically templates that come from Motion 5. If you want edit one of these, Final Cut opens this template up in Motion 5 and you can change how it works using anything that Motion 5 supports. This is both powerful and liberating. See a transition that you like but want it to look slightly different? No problem. Just tweak it in Motion. With prior versions of FCP doing this meant writing a new plugin which was way more complicated and time consuming, not to mention the fact that it required pretty specialized knowledge. Now, as long as you understand Motion, you can create all the transitions and effects that you want without having to write code that goes into a plugin. This is yet another new capability that I really like.
Color grading of your project will get a bit easier with Final Cut Pro X as Apple has integrated the most commonly used elements from its separate Color application right into Final Cut. It won’t do everything that Color did of course, but it will do what most people need to do without having to switch apps and import/export footage back and forth which will be a big time saver for the majority of editors. There’s also now a one-click match color button that adjusts the color of one clip to match that of another. This is an enormous convenience by far and makes it easy to get the color look you want in your project.
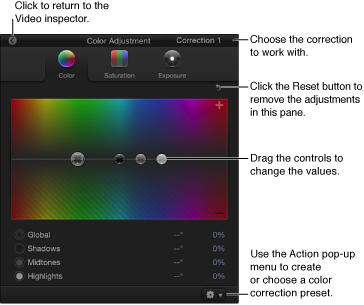
There’s no word yet on what will happen with the Color app from Final Cut Studio 3. Apple may be discontinuing it or a new version may be offered for separate purchase like they did with Motion and Compressor. Advanced users will no doubt still want it for its greater capabilities than what Apple chose to include in FCP X. We’ll just have to wait and see on this one.
In previous versions of Final Cut Studio you had to export your footage out to Soundtrack Pro if you needed to clean up the sound. Final Cut Pro X now includes two important filters: a noise filter to get rid of hiss and similar noise like ventilation system noise, and a hum filter to get rid of the 60 hz line hum that seems to get in everywhere. These filters are now just a click away in FCP X with no need to go to a separate app. There are also a great many more audio filters and effects included. Plus FCP X has the ability to synchronize clips by matching up the audio. This is great where audio is recorded separately from video, as is typical done when shooting with DSLRs. It will also be great when multi-cam support is reintroduced to Final Cut.
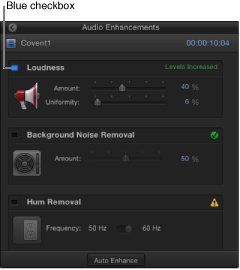
What’s missing of course is the very detailed style editing one could do with Soundtrack Pro. Also gone is the extensive library of loops one could use to embellish your project. Apple is offering a library of sound effects for free download to FCP X users, but this is nothing like the loop library that came with Soundtrack Pro. What Apple will do with the old Soundtrack Pro app is up in the air. Like Color, it may end up being discontinued or it may be updated and offered for sale like Motion was. Only time will tell on this.
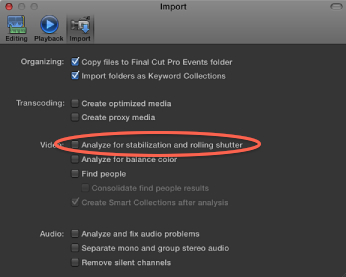
Stabilization of shaky footage existed in prior versions of Final Cut. The change for FCP X is that you can select a checkbox at import time telling it you want the footage analyzed for stabilization. A new feature is that you can also analyze footage for roller shutter artifacts caused by cameras with CMOS sensors. To turn on either correction, just go to the inspector for the clip once you place it in the timeline. It’s all very simple and easy to use.
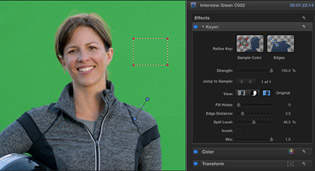
Blue and green screen work just got easier and better with Final Cut Pro X. While keyers existed in FCP 7, as well as in Motion 4, the keyers in FCP X work better and faster. I’ve done chromakey work in FCP 7 and had to sit there twiddling my thumbs while it rendered the video. In FCP X, all this rendering happens in the background and you can watch a preview of the chromakey while the software crunches away on the higher quality version. This significantly speeds up my workflow since I can preview the result and refine the junk masks and edit points immediately. Also, the default parameters do a much better job of achieving a good key result and I also now spend a lot less time refining the keyer parameters. Chromakey work in Final Cut Pro X is just a whole lot nicer than in previous versions of Final Cut.
As with all dot zero releases of a new piece of software, there things missing that I wish were there. One of those is multi-cam support. I work on projects involving multi-cam shoots at times and there’s no support for this in FCP X. Apple has announced that mulit-cam will be back in the next major release of FCP, but unfortunately there’s no word on the time frame for this. I’m going to have to keep FCP 7 around for my multi-cam work in the meantime.
Another thing I miss is the ability to automatically add ease in and ease out on keyframe animation. While just about any parameter affecting the video or audio can be animated with keyframes in Final Cut Pro X, for some reason only certain parameters can have automatic ease in/ease out added to the keyframes. Why ease in and ease out aren’t universally available in keyframe animation I have no idea. Hopefully, Apple will fix this in future updates.
A key feature that’s missing for people who need to use multiple apps in their workflow is the ability to export XML and EDL files for their project. This is a big one for interaction with other apps and is basically a deal-killer for people with these sorts of workflows. Apple says support for this will be coming back in updates, hopefully sooner rather than later.
Also lost is the ability to open older project files from Final Cut Pro 7 and prior. This is a big blow to anyone who needs to work on old projects or wants to incorporate a sequence from an old project into a new one. Apple has said that the new architecture of Final Cut Pro X precludes opening old projects due to the redesigned timeline and change in the implementation of effects and transitions. While there is some truth to this, I believe it would be possible to re-encode a good percentage of older projects into the new format. While I’m sure it would be difficult to figure how to represent very complex FCP 7 sequences in the FCP X, I feel reasonably certain that a great many simple FCP 7 projects could be re-encoded. Hopefully, this is something that a third party application house will decide to tackle. In the meantime, anyone who has older projects that they need to work on in the future will have to keep their copy of Final Cut Studio 3 around. Fortunately, all the apps from FCS 3 continue to run without any problems on Lion.
As mentioned above, there’s no word on the fate of the Soundtrack Pro and Color applications that used to be part of Final Cut Studio. Whether they’re gone for good or will appear in the Mac App Store at a later is unknown and so far Apple isn’t talking.
Fortunately, for those who still need all the features and capabilities of Final Cut Studio 3, the application suite runs on Mac OS X Lion without any issues and can even live along side of Final Cut Pro X, allowing you to use both at the same time. While Apple has removed copies of Final Cut Studio from their stores (including their online store), boxed copies of FCS 3 can still be purchased from amazon.com.
I for one really like the new architecture and Final Cut Pro X and I think it represents a big step forward in the UI for non-linear editing. Even after just the brief usage I’ve had with this new app, going back to the old one looks both quaint and clunky in comparison. For my own work, I don’t intend to use FCP 7 anymore unless I’m doing a multi-cam edit. However, I also have to say that for people in production workflow environments where XML/EDL export is essential, or where the need to continue using old project files exists, then FCP X is not a fit. Nonetheless, I’m confident that within one or two more releases the application will regain much of what’s missing now and will regain much of its former stature. This is the way the UI for non-linear editors should be styled and and it’s only a matter of time until the most critical missing features are restored.
There are many resources available for learning more about using Final Cut Pro X. I recommend the Apple Pro Training Series: Final Cut Pro X and the Apple Pro Training Series: Final Cut Pro X Advanced Editing
as your best two choices for getting the most of the new interface. You can also go directly to Apple’s FCP X online help guide for basic how-to information for this new app.
Category: Apple Final Cut Pro