Jun
4
2010
There are a couple of simple things you can do to speed up your Time Machine backups and save disk space. This tip is particularly useful for users of Final Cut Studio and peer to peer file sharing.
Time Machine was a great addition by Apple to Mac OS X in Leopard. It’s one of the best “set it and forget it” interfaces for running automated backups I’ve ever seen. The snazzy looking visual file recovery interface is nice and simple as well. The default settings for Time Machine are to backup just about everything on your computer. While Time Machine is smart enough not to backup things like the temporary Internet files that Safari creates, it’s still probably backing up some files on your computer that it doesn’t have. While this won’t cause any damage, it does have two unnecessary side-effects: your backups may be taking longer than needed and your Time Machine disk may be filling up faster than need be. Since Time Machine performs hourly backups, you’d like these to go as fast as possible so as not to impact the performance of your Apple computer while you work. You also don’t want to fill up your backup disk with unnecessary files since it means Time Machine will have to delete the older backups sooner and it’s better to have as much history in your backups as possible to aid in file recovery. Fortunately, there are a couple of easy things you can do to help with this.
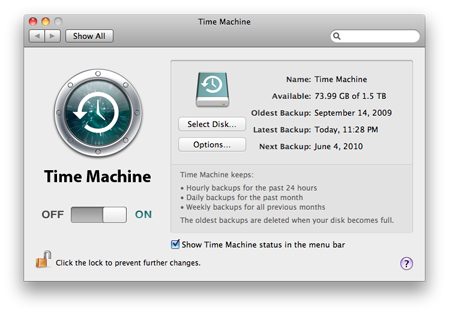
The first thing to do is to create a folder that will specifically be used to store temporary items that don’t need to be backed up at all. I use a folder called “No Backup” that I created on my main disk that’s outside of my home directory that will hold things that are not to be backed up. Then go into the Time Machine Preferences:

and click on “Options”. This allows you to select files and folders to exclude from the automated backups. In the dialog that appears, click the “+” button to add a new folder to exclude, then navigate to where you put the “No Backup” folder and select it. Click OK and now nothing in that folder will be backed up.
What should go in this folder? The basic rule is that anything you can easily get back from somewhere else is a potential candidate. First off, I moved my Safari Downloads folder in there. This way I don’t waste time backing up temporary things I download. If my hard drive fails or I accidentally delete one of these files, I can always just download it again. If I download anything that I want to keep, I simply move it out of Downloads to a more permanent (and backed up) location.
Second, another good category of files to place in “No Backup” are temporary output files. For example, when I’m exporting photos from Aperture that I plan to upload to a photo sharing site, I output them to the “No Backup” folder. My Aperture library is fully backed up by Time Machine and by an extra Aperture Vault, so if my hard disk fails and I lose the exported photos before I can upload them, then I can always just export them again once I’ve replaced the drive. Likewise, when I export a movie from iMovie or from Final Cut, I export it to the “No Backup” folder for the same reason. If something goes wrong, I can always just export it again since the project files and other associated files are stored elsewhere and fully backed up.
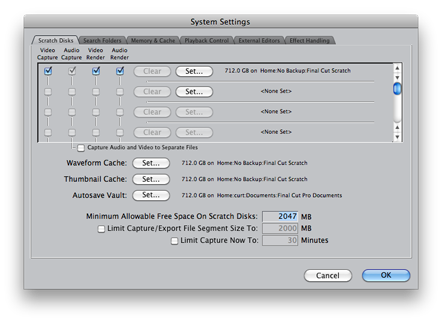
Third, for applications like Final Cut Pro that use a Scratch area, it can be good to put the Scratch Area inside the “No Backup” folder. Final Cut Studio creates and uses a lot of temporary render files which can be quite large. Since these files are created, deleted and modified quite frequently when you’re working on a video project, having the Scratch files someplace where Time Machine is backing these up can waste a lot of time and disk space on your backup drive as it tries to continually backup these files. Once you exclude these from the backups, it can be a big time saver and general performance improvement for your Apple system for heavy users of Final Cut. You can select where the Final Cut Pro scratch files go through the application’s preferences:

You can always get these render files back in the event of a disk failure. You just have to have all your other project files and media stored somewhere that is backed up and then render your project again. If you can afford the time to do this, then not backing up your Scratch files can be a win. However a word of warning here: Final Cut Pro will also put your Video Capture files in this folder as well unless you tell it not to. You should only place your Video Capture files in a “No Backup” folder if you have the original media files safely stored elsewhere so that you can re-capture the footage if need be because of a disk failure. Again, the rule is to only use the “No Backup” folder for files that can be recovered through other means. If you’re capturing video and don’t have the ability to re-capture it (such as capturing footage from a live feed), then make sure your Video Capture is placed in a folder that is backed up regularly.
Fourth, another good category of files to skip backups for are the temporary files created by peer to peer file sharing programs like bit torrent. These files change frequently during a download and so will send a lot of data to your backup disk that’s probably unnecessary. If something goes wrong and you lose these temporary files, then you can most likely just start the download over again. Check the documentation for the peer to peer file sharing program you’re using and it will probably tell you how to specify the location for the temporary files.
I think you get the idea at this point. Set things up like this for files that can easily be recovered through other means and you’ll save yourself potentially a lot of time and speed up your Time Machine backups.
Category: Apple Mac OS X