Did you know that there can be hidden partitions on your hard drives? Find out how to reveal them in Mac OS X and take a look at what’s in them in this article.
Under some circumstances Mac OS X places hidden partitions on your disk drives. These are for specialized use by Mac OS and are kept hidden to prevent accidental alteration of their contents. One example of a hidden partition is with Mac OS X Lion. When you install Lion, it also creates a hidden disk partition called “Recovery HD” which is used to recover your boot drive in the event your Lion installation becomes unusable for some reason. The goal with this hidden partition is to get you up and running again as quickly as possible in case disaster strikes. The hidden partitions that Mac OS X uses are very small, so the space they consume should not be of any concern.
If you’d like to take a look at what’s going on under the covers with these hidden partitions, then turn to the Disk Utility application. Before you launch it, however, we need to enable some hidden features in the app itself. A trip to the Terminal application is needed to activate the debug menu in Disk Utility. (If you’re not familiar with using Terminal, see Using the Terminal App.) Launch Terminal and type the following command (cut and paste is recommended):
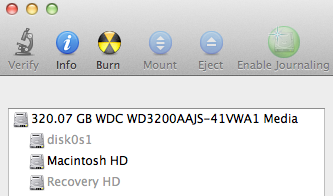
defaults write com.apple.DiskUtility DUDebugMenuEnabled 1This will enable the undocumented debug menu in the Disk Utility app. (If you ever want to turn the debug menu back off, just re-run the above command and replace the 1 with a 0.) Now launch Disk Utility and you will see the debug menu appear. Go there and select the “Show every partition” option. When you do so, some new partitions will appear in the column on the left. If you’re running Lion, then you’ll see something like this for your main boot drive:

The “Recovery HD” partition is now clearly visible. You can even mount it to take a look around by selecting it and then pressing the “Mount” button. If you choose to do this, be careful not to change anything on it or you may render the partition unusable in the event you need it for a real recovery.
Category: Apple Mac OS X